- The right tool for the exact phase: Use a simple printed PDF on a clipboard for the chaotic first week, then transition to a spreadsheet for long-term tracking of institutional red tape.
- Map the entire landscape early: A checklist is useless if it misses accounts. You must build a master inventory covering traditional finance, physical property, and digital assets.
- Track the communication loop: The biggest delays happen when executors wait for institutions. Your tracker must include escalation steps for when banks or insurers stop responding.
The Reality of Managing Estate Paperwork
When I first started helping families navigate the administrative maze of closing an estate, I noticed a very clear pattern. Within the first few days, almost everyone goes online searching for a free executor checklist template. They want a map. They want a clear set of boxes they can check off so they can sleep at night knowing they are not missing anything critical.
But there is a problem. Most of the checklists you find out there are either overly simplistic (“Step 1: Plan the funeral. Step 2: Pay the bills.”), or they are dense legal roadmaps designed by attorneys that read like a law school textbook. Neither of these helps you on a Tuesday morning when you are staring at a stack of mail, holding on line with a utility company, and trying to remember if you already sent them a death certificate.
Let me share a quick field note. In one case I supported last year, the executor lost three full weeks of progress. Why? Because she had five different sticky notes scattered across her desk with reference numbers for a regional credit union, a life insurance provider, and a former employer’s pension administrator. When the insurance company asked for a secondary claim form, she could not find the original case number to bypass the main phone menu, forcing her to start the verification process all over again.
Key Point: An effective checklist for an executor is a living operational document. It is less about outlining probate law and much more about tracking who has what, what is currently missing, and what exactly you need to do next to unblock the process.
In this guide, I will walk you through the different formats of checklists. We will cover how to build your master inventory, how to handle the critical first week of mail triage, and how to escalate matters when institutions simply ignore your requests.
What This Template Is (And What It Is Not)
Before we dive into customizing your tracker, we need to set some ground rules. One of the most common mistakes I see first-time executors make is treating a downloaded checklist as a legally binding instruction manual for their specific county court.
Every state, and often every local probate court, has its own highly specific timeline, required forms, and local rules. No universal checklist on the internet can replace the specific instructions given by your local court clerk or your estate attorney.
| ✅ It is | ❌ It is not |
|---|---|
| A workflow organizer to help you track physical documents, phone calls, account discoveries, and communication statuses. | Legal advice or a substitute for a probate attorney. |
| A single source of truth so you and any co-executors know exactly where the administration stands on any given day. | A definitive guide to state-specific tax deadlines or court filing dates. |
⚠️ Warning: Whenever your workflow tracker conflicts with instructions from a judge, court staff, or your legal counsel, the local authorities always win. Use this template to organize your desk, not to interpret the law.
Building Your Master Institution Inventory
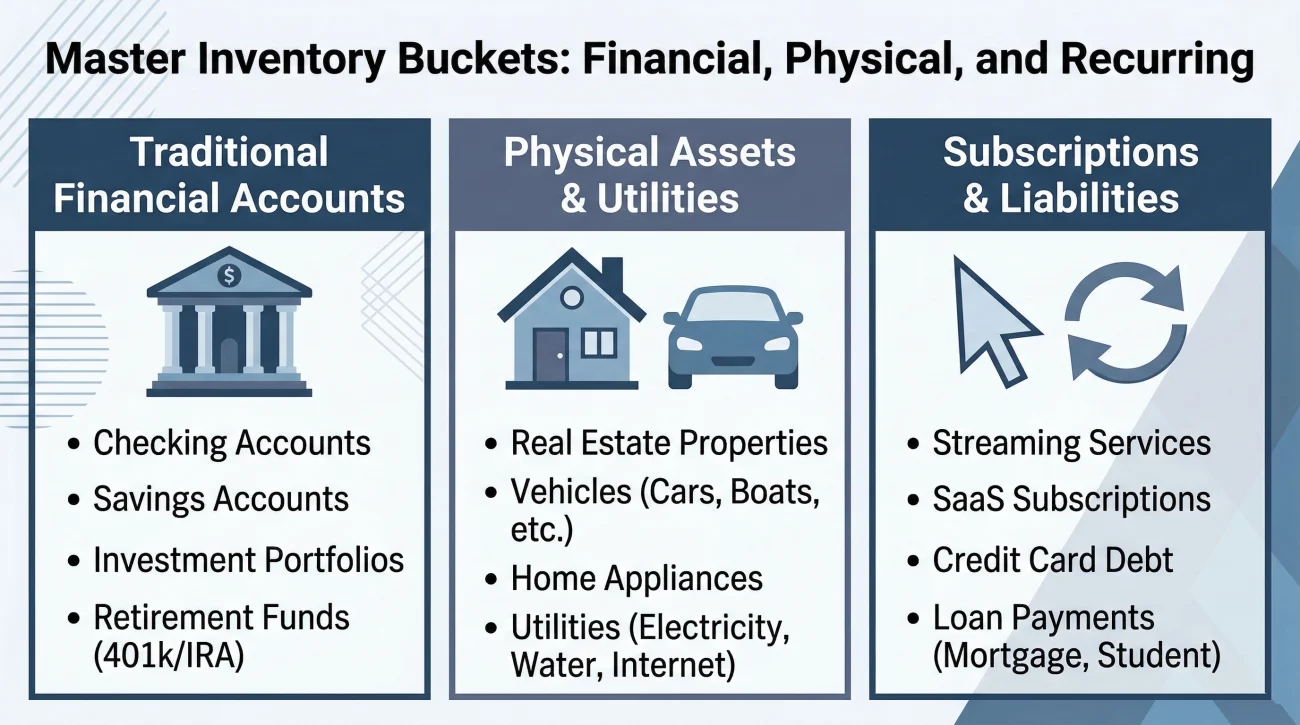
A static item on a checklist like “Close Bank Accounts” is practically useless. Which bank? Which accounts? Who is the contact person? You need to expand generic categories into a specific, actionable inventory. Before you start crossing things off, you have to build the landscape of the deceased person’s life.
I recommend breaking your spreadsheet down into clear categories so you do not get overwhelmed. Here are the common buckets you must account for.
Traditional financial accounts
This is where most of the money sits. You need to look for checking and savings accounts, certainly, but do not forget about dormant accounts. Commonly missed items include an old 401(k) from a job they left ten years ago, credit union accounts opened just to get a car loan, and paper savings bonds tucked in the back of a drawer.
Physical assets and utilities
Your checklist must track the physical estate. This includes the primary residence, vehicles, and the services that keep those assets safe. You need rows for the mortgage company, the auto loan provider, the homeowners insurance, the auto insurance, the municipal water utility, the electric company, and the gas provider.
Subscriptions and recurring liabilities
In the modern era, small recurring charges will drain an account over time if you do not track them down. Your inventory should list credit cards, cell phone carriers, internet providers, streaming services like Netflix or Hulu, gym memberships, and monthly charity donations. The most reliable way to find these hidden drains is to pull the last three to six months of the deceased person’s checking account and credit card statements and flag every single recurring charge.
Handling Digital Assets on Your Checklist
This is a massive gap in almost every old-school executor checklist I review. Today, a significant portion of a person’s life exists entirely online. You must track digital assets, but you have to do it carefully.
You need to add specific rows to your tracker for primary email accounts (like Gmail or Yahoo), payment apps (like Venmo, PayPal, or CashApp), and any cryptocurrency wallets or exchange accounts. You also cannot ignore social media. Platforms like Facebook, Instagram, and LinkedIn have specific, official pathways to memorialize or permanently delete a deceased user’s account, which is a key part of protecting their digital identity. If the person owned a small business, you must also track domain name registrations and website hosting platforms.
❌ Note: Do not attempt to guess passwords or bypass two-factor authentication to log into these accounts directly. This often violates terms of service and can sometimes trigger automated fraud lockouts. Instead, your checklist task should be: “Locate terms of service for deceased user access and request official transfer.”
Track the progress of these digital asset transfers exactly as you would track a physical bank account. Note who you emailed at the tech company, the support ticket number, and the date you submitted the death certificate.
The Printable PDF Checklist: Triage in Week One
When you look at that massive master inventory, from physical property to digital subscriptions, it is easy to feel paralyzed. That is why you must match the right tracking tool to the right phase of the process.
In the immediate aftermath of a loss, your brain is usually foggy. During this window, you do not want to be tabbing through a complex Excel file on your laptop. You need something tactile. You need a printed PDF on a physical clipboard.
During the first few days, your goals are purely stabilization and protection. If you are entirely unsure where to begin, I highly recommend looking at our executor first steps checklist to understand the roadmap, and then using your printed tool to track those specific early actions.
Mail triage and avoiding early mistakes
One of the most vital uses of your paper checklist in week one is managing the incoming mail. When you forward the mail to your address, a massive stack of envelopes will arrive. This is where many executors make a critical error: they panic and start writing checks from their own pocket to pay the deceased’s bills.
Opening a credit card bill, seeing a late fee, panicking, and paying it immediately with personal funds before having official court authority.
Opening the bill, writing “Discover Card” on your printable checklist, placing the bill in a “Hold for Review” folder, and waiting until the estate account is properly opened.
Your paper checklist should track what you have found, not necessarily what you have resolved. Add tasks for securing the physical property, locating the original will, and ordering the initial batch of death certificates. Do not rush to close accounts or pay debts in week one.
The Spreadsheet: Your Month One Workhorse
Once the initial rush subsides and you begin formally communicating with banks and creditors, the paper clipboard will become too small. You must transition to a digital executor checklist spreadsheet (Excel, Google Sheets, or Numbers) to handle the sheer volume of data.
To make the spreadsheet functional, you need columns that force you to record the operational reality of the task.
| Column Name | Why You Need It | Example Entry |
|---|---|---|
| Institution / Asset | Identifies the exact account. | Fidelity IRA ending in #9921 |
| Current Status | The most important column. Never leave it blank. | Pending – Mailed DOD balance request on 10/12. |
| Reference / Case # | Saves you 20 minutes of holding time on the next call. | Case #998877-A |
| Requirements Given | What did they specifically ask for in writing? | Needs original death cert + notarized claim form. |
| Next Action Date | Tells you exactly when to follow up so you do not worry daily. | 10/26/2023 |
One of the best ways to customize your tracker is to ask institutions for their specific requirements, and then copy those exact requirements into your spreadsheet. When you notify a financial institution of the death, never assume you know what they want based on what another bank asked for.
Ask them to put it in writing so you can populate that “Requirements Given” column accurately. Here is a safe, neutral script you can use to request this over the phone or via email:
“I am acting as the executor for [Name]. Please send me a complete, written list of all documents your legal department requires to process this account, along with the correct mailing address and any specific reference numbers I need to include.”
When Institutions Ignore You: The Escalation Track
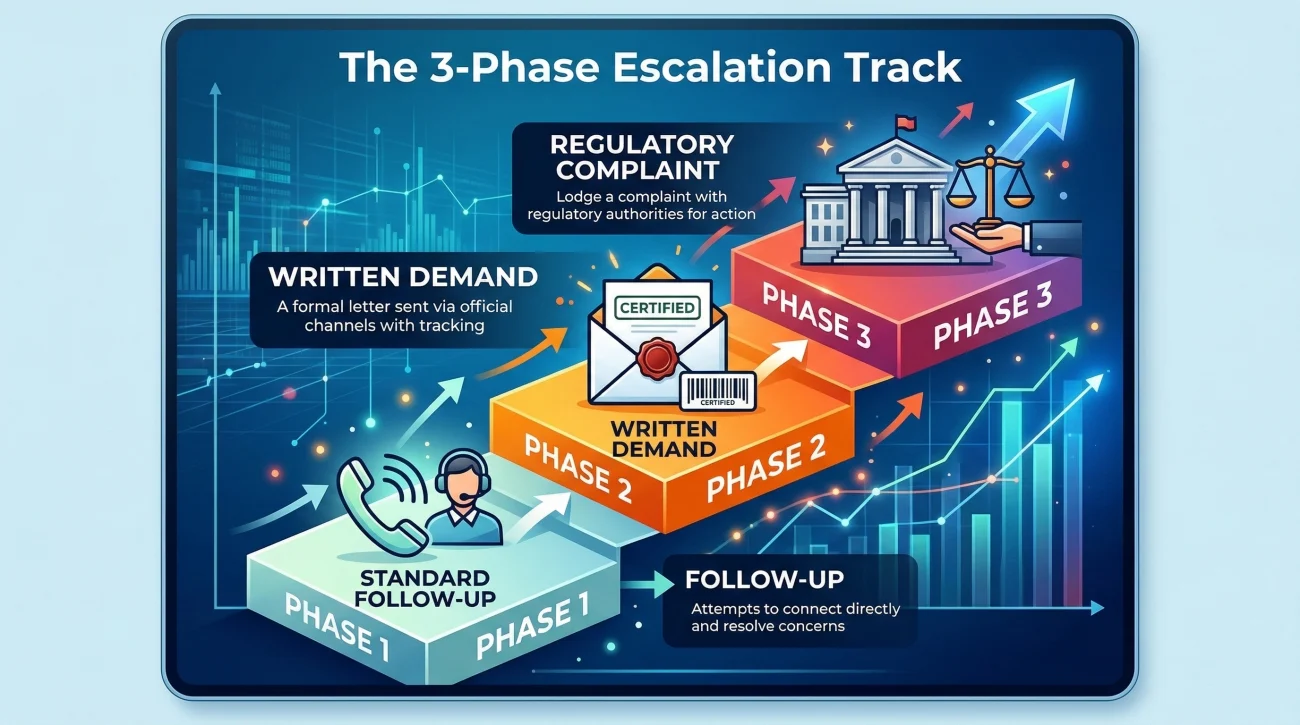
A major pain point that basic templates miss is the reality of corporate delays. You will inevitably encounter a bank or an insurance company that simply stops responding. Your checklist needs to track your escalation efforts.
I see this frequently with large, bureaucratic life insurance providers. You mail the certified death certificate, and then hear nothing for six weeks. Every time you call, a different representative tells you it is “under review.”
Here is how you track escalation on your spreadsheet. Move through these stages and log the dates:
- Phase 1 (Standard Follow-up): Call customer service, provide the reference number, and ask for a specific timeline. Log the representative’s name and the date.
- Phase 2 (Written Demand): If another two weeks pass, send a formal request via certified mail with a return receipt. Update your spreadsheet to: “Escalated – sent certified mail tracking #12345.”
- Phase 3 (Regulatory Complaint): If the institution is still silent after a month, escalate to a regulatory body like the state department of insurance or the Consumer Financial Protection Bureau. Do not just sit and wait. Go to the agency’s website, submit a formal online complaint, and note the complaint number in your tracker. Often, just telling the bank you have filed a formal complaint is enough to magically unblock the process.
Script for Phase 2 Escalation (Written):
Hello,
I submitted the required documentation for this account on [Date]. It has been over 30 days without a formal response or status update. Please provide a written update on the status of this claim within 5 business days, or let me know exactly what additional information your department is missing.
The Checklist for Closing the Estate
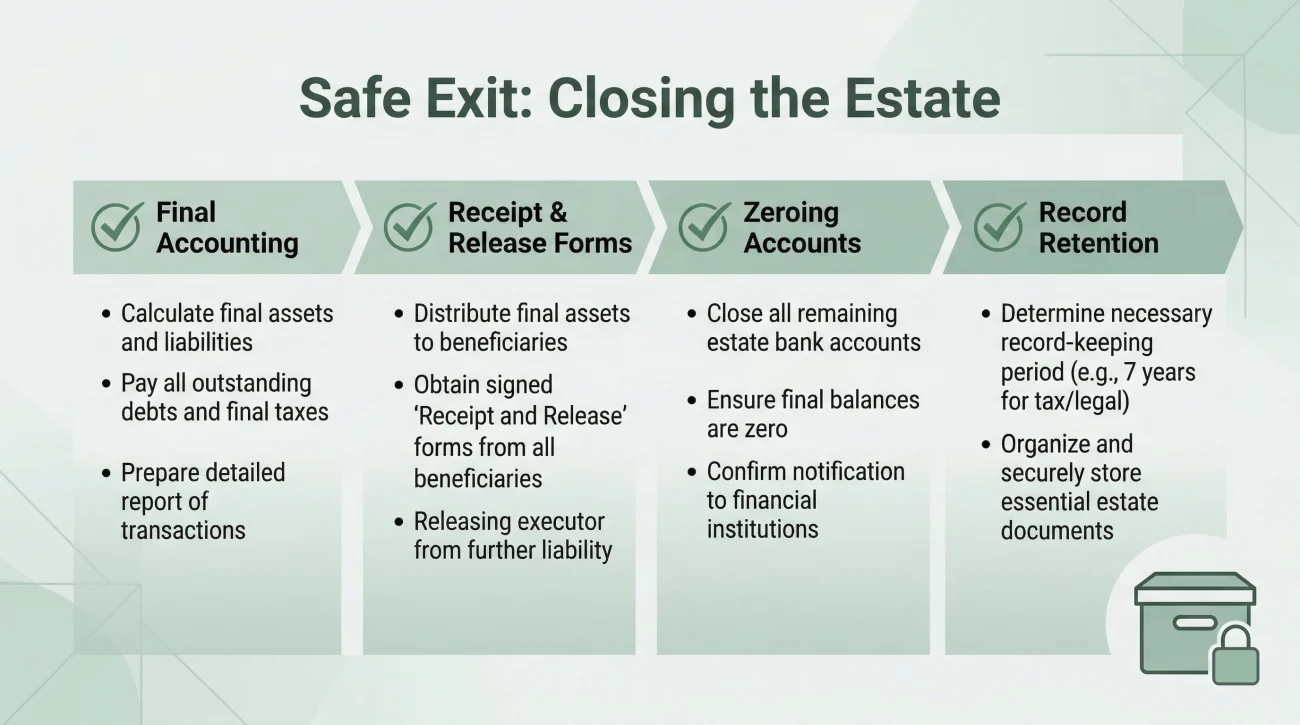
Fast forward a year. You have gathered the assets, paid the legitimate debts, and filed the necessary tax returns. You are not done yet. Your spreadsheet needs a final category dedicated to closing the estate safely.
The closing phase is highly sensitive because this is when beneficiaries expect to be paid, and it is the moment of highest liability for you as the executor. Your final checklist items should include:
- ✅ Final Accounting Preparation: Compiling your spreadsheet logs and bank statements into a clear report for the heirs or the court.
- ✅ Receipt and Release Forms: Ensuring every beneficiary signs a document acknowledging receipt of their funds and releasing you from future liability before you hand over the check.
- ✅ Closing the Estate Account: Bringing the estate bank account balance to exactly zero after all final checks have cleared.
- ✅ Record Retention: Packaging your spreadsheet, receipts, and tax filings into a secure digital archive or physical box. Generally, you should hold onto these records for three to seven years depending on the advice of your tax professional.
Final Thoughts on Estate Tracking
Taking on the role of an executor is fundamentally a job of project management. It is about keeping the momentum going, ensuring documents do not fall through the cracks, and having an indisputable record of every action you took to settle the estate fairly.
Do not let the paperwork intimidate you. Break the estate down into the master inventory buckets we discussed. Use paper for the initial triage, transition to a digital tracker for the long haul, and do not be afraid to escalate when corporations drag their feet. By building your inventory methodically and maintaining strict communication hygiene, you transform a massive, overwhelming legal burden into a manageable series of daily actions. Trust your tracking system, and you will get through it.
❓ FAQ
🖨️ How can I use a PDF checklist if I don’t have a printer?
If you do not own a printer, you can export the PDF to a tablet and use a stylus app to check off items, or simply visit a local library or shipping center to print a few physical copies. Having a physical master binder in the first week is highly recommended.
📝 How do I transition from the paper checklist to the spreadsheet?
Around week three, sit down with your paper clipboard and your newly collected mail. Open your blank spreadsheet and manually type every discovered asset and pending task into its own row. Once transferred, file the paper checklist away as a historical record and work exclusively from the digital file.
📲 Is it difficult to view the spreadsheet version on a smartphone?
It can be, but you can fix this easily. If you use the Google Sheets or Excel app, go to the settings and “Freeze” the top header row. This allows you to scroll down through dozens of accounts while standing in a bank lobby without losing track of which column is the “Reference Number.”
💼 Why does the local court clerk’s checklist look different than online ones?
A court clerk’s checklist focuses strictly on mandatory legal filings (e.g., Inventory of Assets deadline, Notice to Creditors). A personal workflow template focuses on the daily administrative grind (e.g., calling the cable company, tracking down a lost car title). You need both.
🏦 What is the best way to handle multiple accounts at the same bank in my tracker?
Create a separate row for each account, but use the “Notes” column to link them. For example, note that “Checking ending in 1234” is tied to a specific beneficiary, while “Savings ending in 5678” pays into the general estate. They often require different routing paths inside the bank.
⏳ Can I start filling out the spreadsheet before I get the death certificates?
Absolutely. The waiting period for death certificates (often 10 to 14 days) is the perfect time to build your master inventory. Dig through filing cabinets, review the last three months of bank statements, and list every institution in your spreadsheet so you are ready the day the certificates arrive.
👥 How do I prevent overwriting data if sharing this with a co-executor?
Use a cloud-based option like Google Sheets that supports real-time collaboration and version history. Add a column titled “Owner” so it is clearly documented which executor is responsible for calling which institution, preventing duplicated phone calls.
📁 How exactly should I store the digital checklist when the estate closes?
Download a final, static copy of the spreadsheet as an Excel file or PDF. Store it on a dedicated USB flash drive alongside scanned copies of the final accounting, bank statements, and beneficiary release forms. Keep this drive in a fireproof safe.
🛑 Is it safe to store passwords on the spreadsheet?
No. Never type full passwords, sensitive PINs, or the deceased’s full social security number into a general daily tracker. If your laptop is stolen or you accidentally share the link, that data is compromised. Keep highly sensitive data in a secure password manager or a locked physical safe.
🔄 What is the best routine for keeping the spreadsheet updated?
Many successful executors implement “Estate Sunday.” Pick one specific hour each week to sit down, open all the accumulated mail, review your phone notes, and update all the status columns in the spreadsheet at once. This prevents the admin work from bleeding into your daily life.
⚠️ Disclosure: I'm not an attorney and nothing on this site is legal or tax advice. The content covers process, organization, and workflow—the operational side of estate administration. For legal interpretation, jurisdiction-specific deadlines, contested situations, or tax matters, please work with a licensed professional in your state.